In this guide, we’ll walk you through the anatomy of a card within Legalboards. We’ve heard from our users that knowing every aspect of the card’s features can be overwhelming, and we’re here to help with that! Before we get started, let’s go over the basics of a Kanban board and why they can be beneficial to lawyers.
Please note, if you’re a visual learner, there is a video summary at the end of this guide.
What’s a Kanban Board?
In our Anatomy of a Board guide, we walk you through both the basics of a Kanban board and boards within Legalboards. You can read more about that here.
To give you a basic understanding of a Kanban board, it’s important to understand that Kanban boards can be extremely simple. At their most basic stage, they can reflect on the progress of a project in terms of what needs to be done, what’s currently being worked on, and what has been completed.
As such, the columns on a board are usually the phase/stage of the work and cards are the task, matter, etc., that fits into that phase.
The Basics of a Card
If a card reflects the work that needs to be done, for legal teams, cards can reflect matters with sub-tasks within that matter. In Legalboards, cards can hold a lot of important information and we’ll talk a bit about that now.
There are three types of cards- contacts, notes, and matters. Contacts and note cards are helpful for organizing specifics of your workflow. For example, note cards can be used to denote important information to your team. By pinning note cards within a column, you can easily communicate considerations for that specific phase. Matter cards are the most common type, and what we will primarily focus on within this guide.
Whenever you open a card, you’ll see one of two things. If you have a checklist attached to the card, you’ll see that, but if you do not, you’ll see the details of the card. You can see this in the image below. It’s also important to note here that checklists are only for within Legalboards, it will not be shown in your case management software.
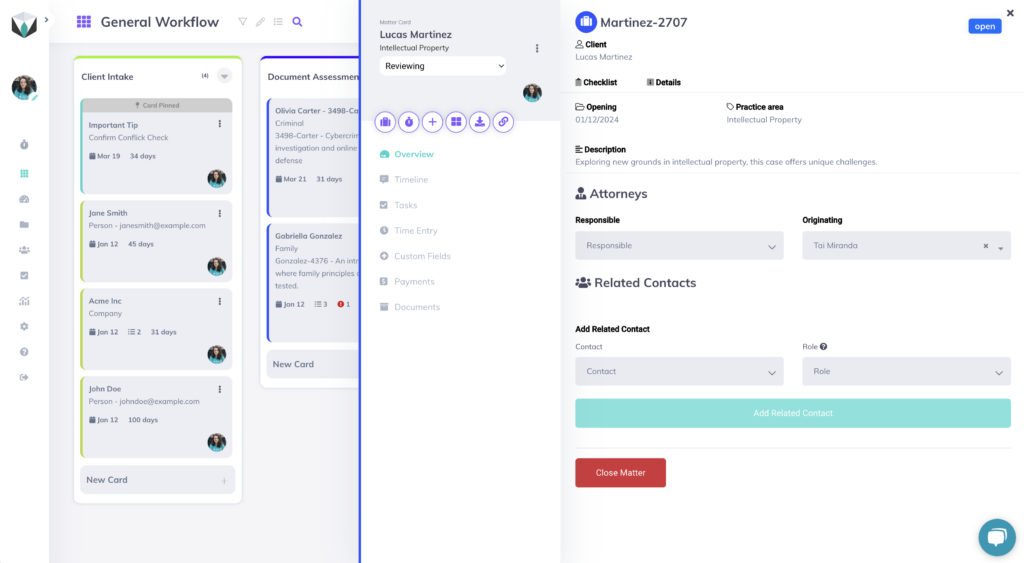
In the details, you’ll see everything about your card. This includes:
- Client name and contact information
- Practice area
- Key dates: open, pending, limitation, and closing dates
- Description
- Responsible Attorney
- Originating Attorney
- Related contacts
- And Any custom information you want
There is also the option to show/hide unanswered fields so you can see only what is appropriate for this card.
Card Menu
To the left of any card is a menu that helps organize different aspects of a card. Here, you’ll see the name and number of the matter (based on your integration data) and what column the card is in. Next, you’ll see the label attached (denoted by the color) and a few buttons.
The first button is how to open your integrated case management, in our example is Clio, “start a timer”, new task, task board, export card, and copy card link. You’ll also see the “Edit Matter” button or the link for the integrated tool to open the same matter.
From there, the tabs give you options. The overview tab is to see the card details and checklist. The timeline tab lets you view the activity of this card- it will break down movements, automations, and detail changes. You can also filter the timeline by activity.
Next, we have time entry. This is where you can start a time entry and keep track of those entries as related to this specific card. Then you have activities.
Next is tasks. This is where you can see the work that needs to be done for this matter and their due dates. You can also see the list of completed tasks by hitting the show completed tasks button. You can also click on the task directly to see more information about it. When clicked, the task will show the assignee, reporter, date, description, checklist, and work logs (time entries).
Depending on your integrations, there are also notes, communications, payments, documents, and Docuplayer. Each of those gives you more information about an aspect of a matter. For example, LawPay integration users will see information about their billing and invoicing in the payments tab.
Board View: Card Navigation
An easy option to view more information and edit cards is directly within your board view. When looking at your board, you can click on the three dots on the right side of a card to quickly make changes.
By clicking on the three dots, 6 options will appear. You can edit the card or the members, archive or delete the card, pin the card to the top, or duplicate the card.
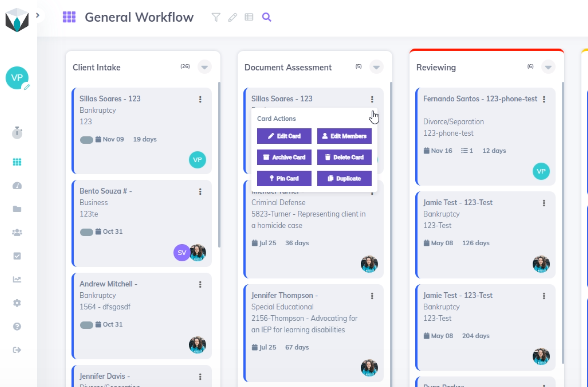
If you click “edit card”, you can edit the title, subtitle, and apply a label. Labels help designate the current status of the card. If you click on “edit members” you can directly edit the card members. If you need more help with managing board members, please refer to this guide. When you add new members, you’ll see both of their tiles on the card.
Archiving a card means the card will be greyed out and added to the archived card column. Deleting a card however, means it is no longer viewable.
Summary
Check out this video summary of this content (with some more detailed examples) below.
If you have any questions, please feel free to contact us at support@legalboards.com, use the chatbot in your account, or take out a support ticket here. If you have any questions about how boards work, check out our guide here, which should help you grasp more about organizing and managing your boards.

